
시작하기
첫 조사
이 페이지는 설치부터 내보내기까지의 전체 과정을 안내합니다: 앱 열기, 작업할 영역 다운로드, 기록 프로토콜 선택, 야외에서 관찰 입력, 수집한 내용 검토, 데이터 반출입니다. 각 단계는 전체 세부 내용을 담은 전용 페이지로 연결됩니다.
No account, no connection required. All data is stored in a single on-device database. Your records leave the device only when you export them or push them to a Drive folder yourself. The optional online features — weather, AI identification, GBIF, iNaturalist, place and taxon search, map tiles — send only what they need to work; see the privacy policy. The app works with the radio off once you have downloaded the map area you need.
앱 처음 실행하기
When you open EarthCape for the first time, no sign-up is required. The app creates a project for you automatically, named after your device, selects it, and assigns the Casual / incidental protocol. The project is empty — it contains no sample data, no demonstration observations, and no pre-loaded species lists. Use it as it is, or rename it before you begin.
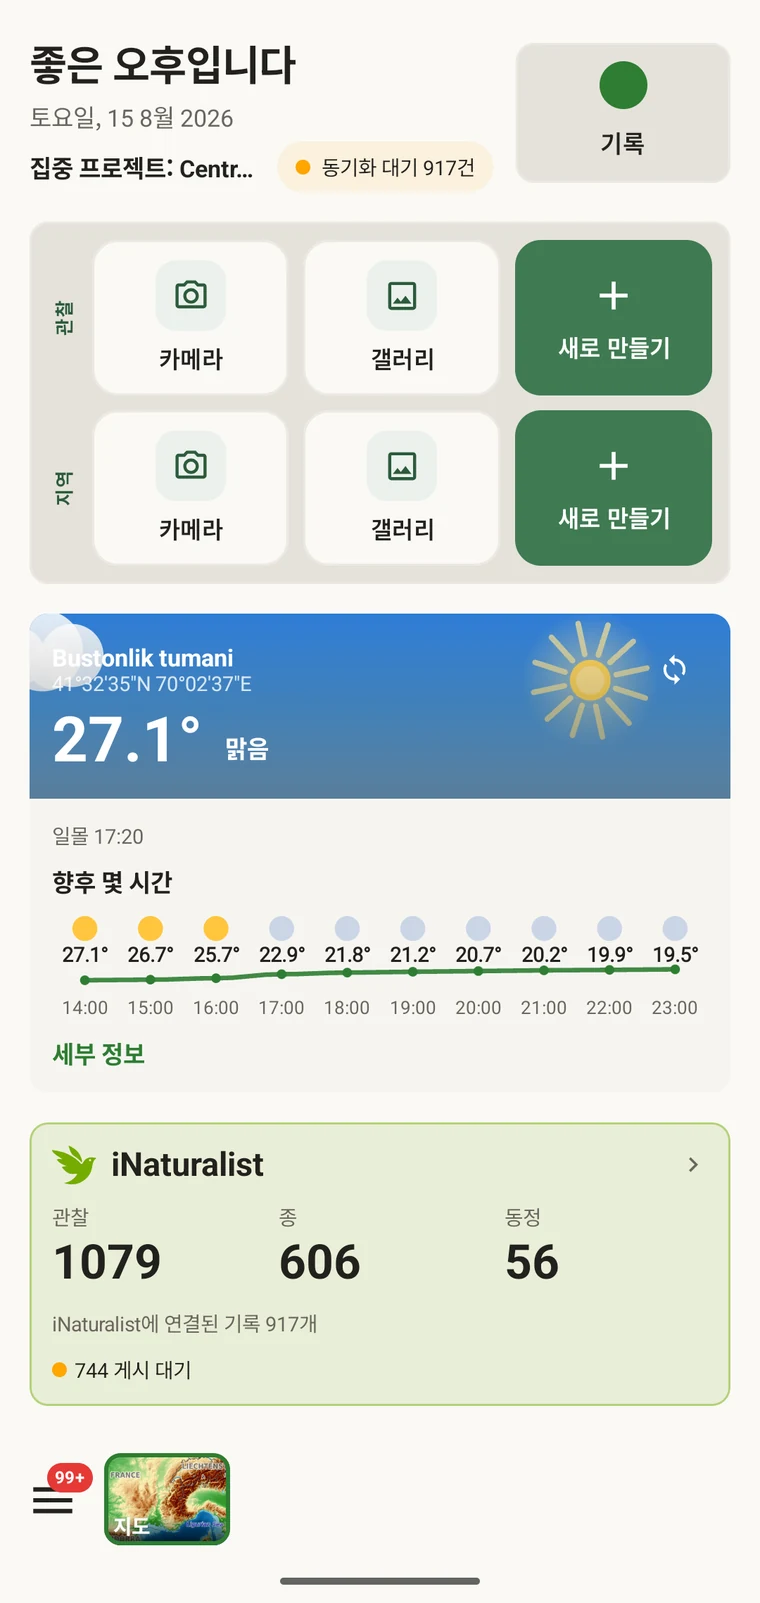
The home screen carries the Record button, quick actions for a new observation or locality (camera, gallery or blank form), and the weather card. Everything else — the map, your data lists, protocols, projects and Admin — is reached from the Menu button at the bottom left.
- 앱을 여십시오. 자동으로 생성된 프로젝트가 선택된 상태로 홈 화면이 로드됩니다.
- If you want to rename it, open Menu → Projects, tap the project and edit its name.
- Take note of the protocol shown — it is Casual / incidental by default. You can change it before you start recording; see Setting the protocol below.
지도 영역 다운로드하기
기본 지도는 자체 인프라에서 제공하는 벡터 타일로 전 지구를 포함합니다 — API 키도, 사용량 상한도 없습니다. 야외로 나가기 전에 작업할 영역을 다운로드하면 지도, 지형, 3D 기복이 모두 무선 통신을 끈 상태에서 작동합니다. 자세한 내용은 지도 및 타일 서버와 오프라인 지도를 참조하십시오.
영역 다운로드하기
- Open the map (Menu → Map).
- 조사 현장으로 이동하여 필요한 영역이 화면에 들어오도록 맞추십시오.
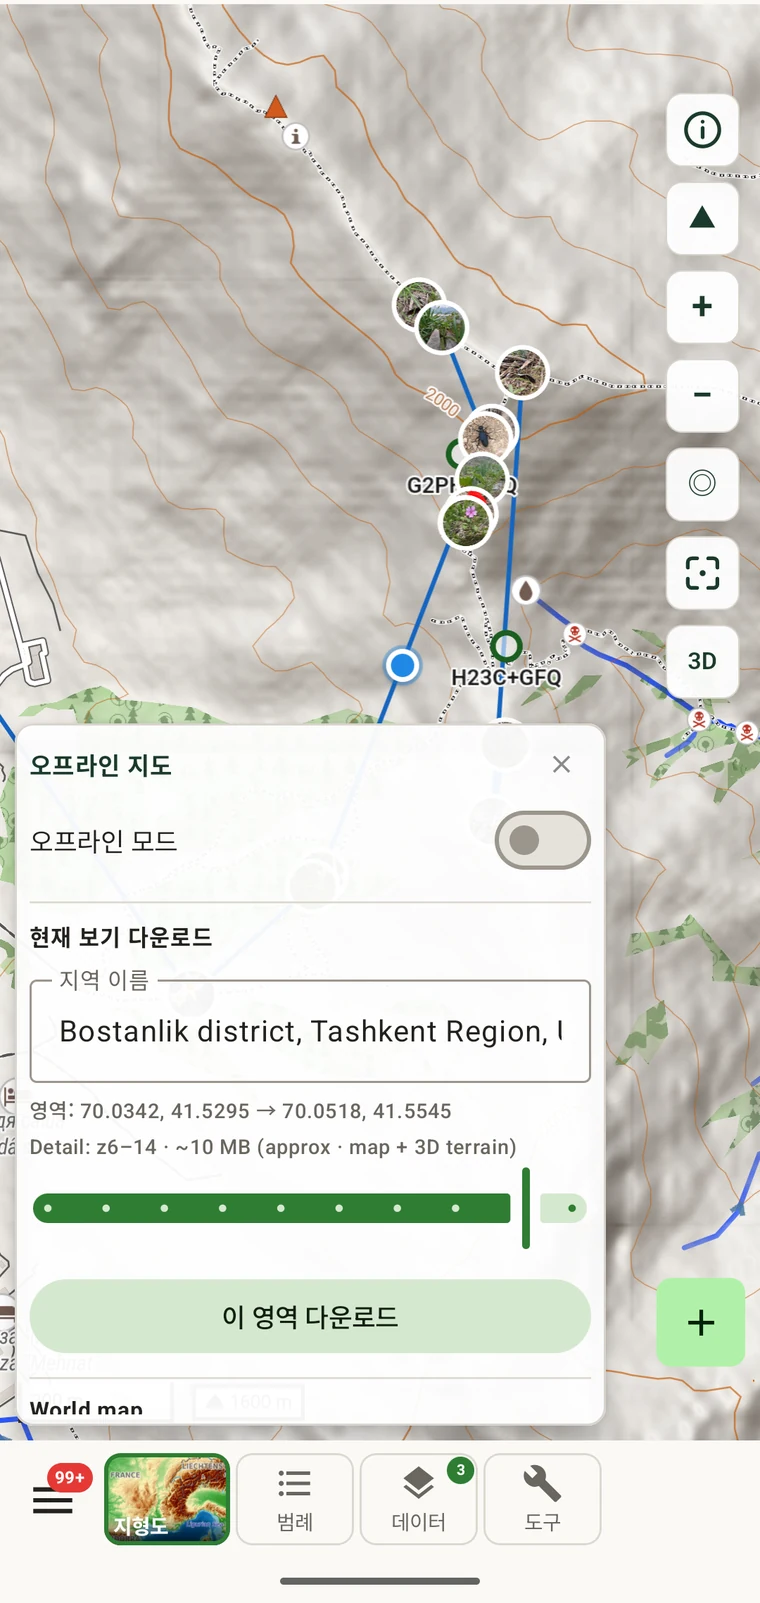
- Tap Tools in the toolbar at the bottom of the map screen, then tap Offline.
- The panel shows "Download current view". A region name is suggested automatically while you are online — for example, "Bostanlik district, Tashkent Region, Uzbekistan"; otherwise type one.
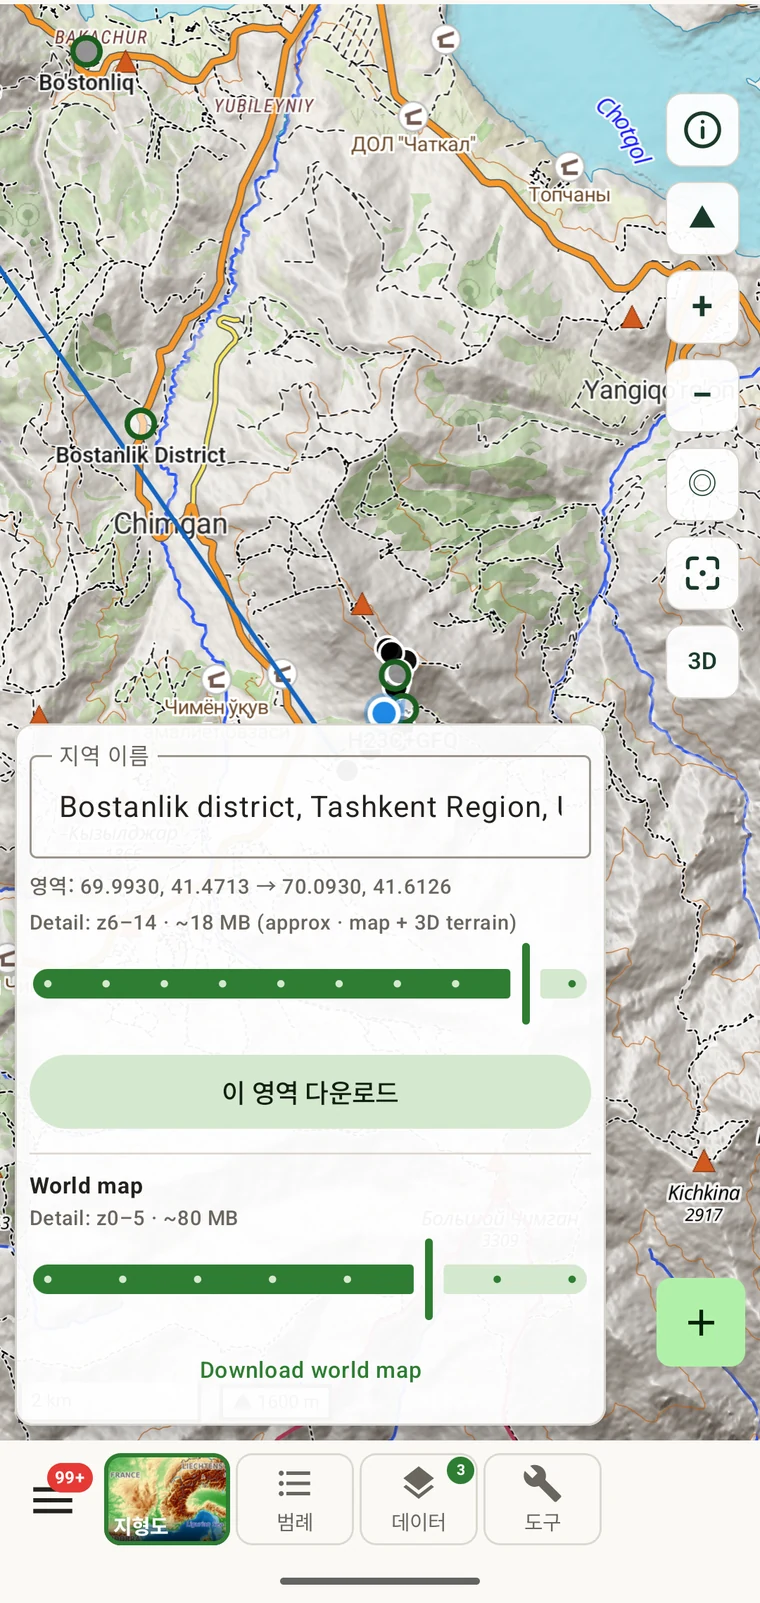
- Check the coordinates and size estimate. The estimate depends on the area and terrain — the district-sized example in the screenshot is about 11 MB at z6–14 — and includes the map and the 3D terrain model.
- "이 영역 다운로드"를 탭하고, 연결이 있는 곳을 떠나기 전에 다운로드가 끝날 때까지 기다리십시오.
세계 개요 추가하기
The world overview (z0–5, approximately 80 MB) gives you a rendered basemap at all zoom levels, so the map is never blank when you zoom out beyond your downloaded region. It only needs downloading once.
- In the same Offline panel, scroll down to World map. The detail line reads "Detail: z0–5 · ~80 MB"; the slider lets you change the depth (z0–7).
- "세계 지도 다운로드"를 탭하십시오.
프로토콜과 양식 설정하기
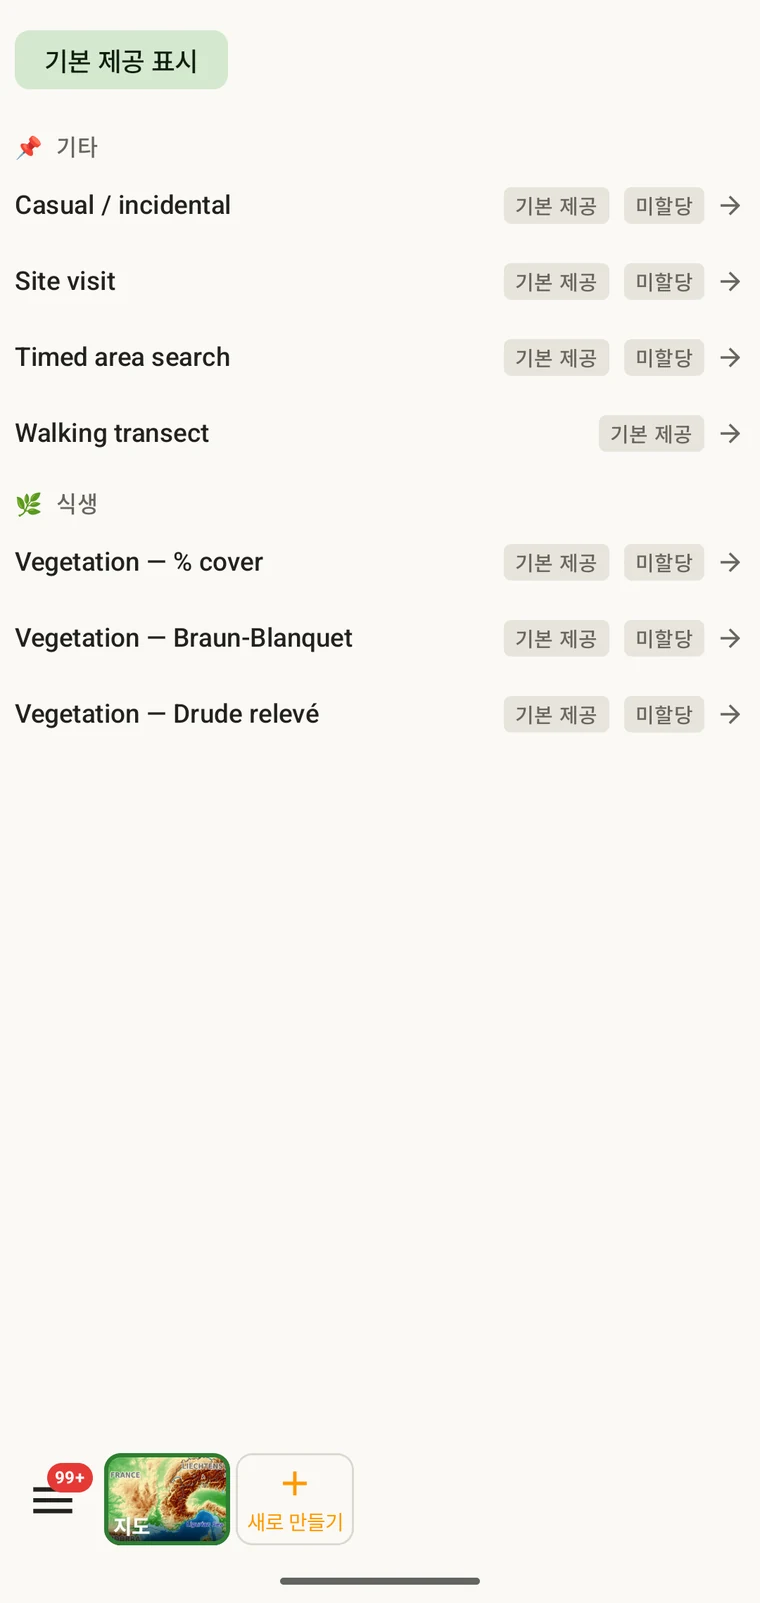
A survey protocol defines the structure of a recording session: what a visit is, which fields appear on the observation form, and how the data is organised for export. Every observation in a project is recorded under the project's active protocol. Seven protocols ship with the app, including Casual / incidental, which is assigned automatically to new projects. You can change the protocol, clone a built-in one to edit it, or write a new one in the Protocols Studio — all on the device.
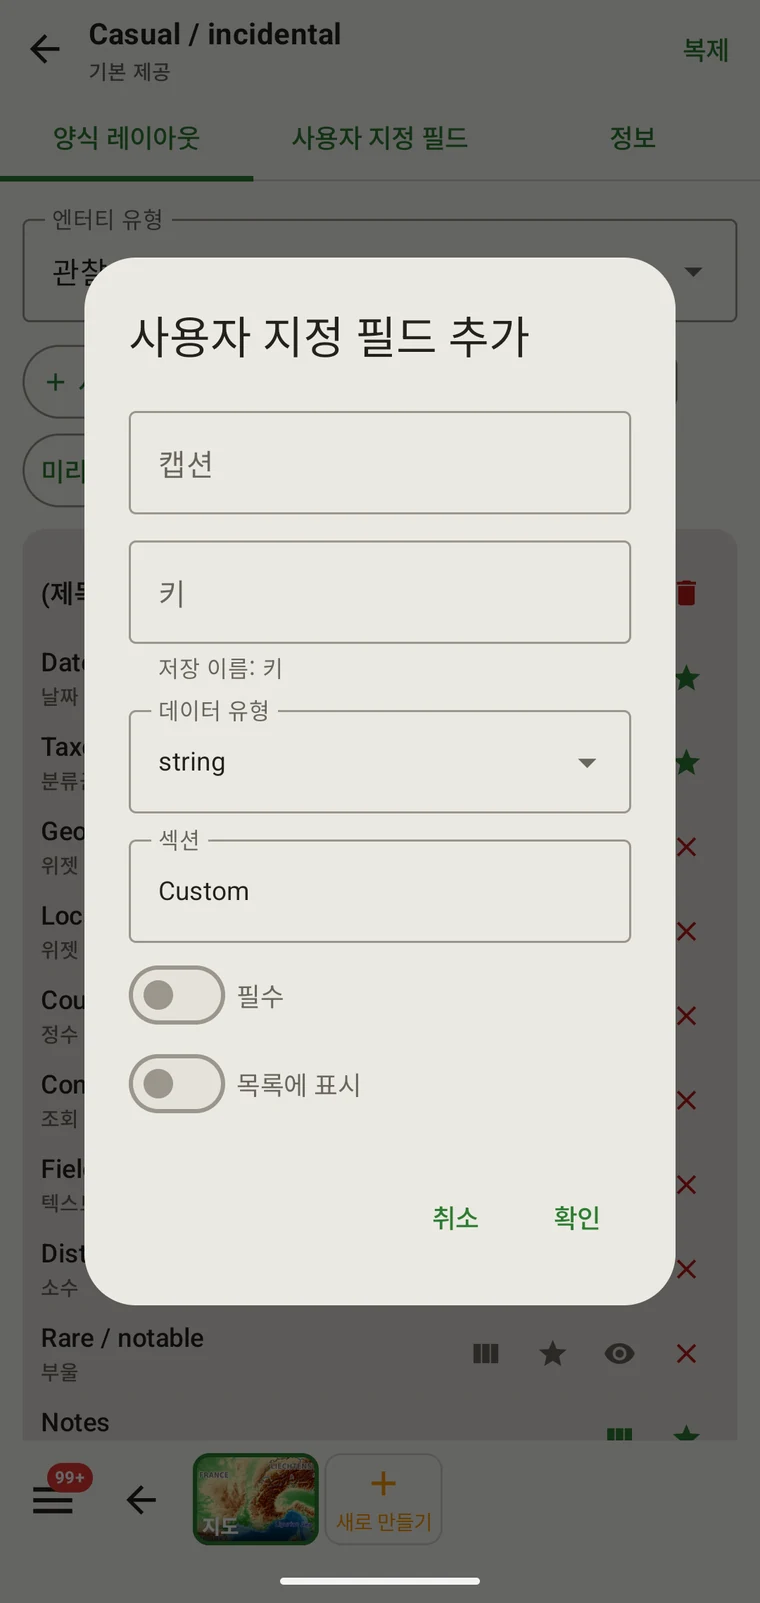
The Form builder lets you control the field layout for each entity type: show or hide fields, reorder them, group them under headings, and add custom fields. Custom fields defined before the season starts travel with the project, so the whole team's form looks the same from the first day.
- Open Menu → Protocols. The list shows all seven built-in protocols and any you have created.
- Tap a protocol to view it. To assign it, open Menu → Projects, tap your project and under Survey protocol tap Assign a protocol (or Change).
- To add a custom field, open the protocol in Protocols, switch to the Form builder tab, choose the Entity type (for example Observation) and tap Add custom field. Set the caption, key, data type and section, and whether the field is Required and Show in list.
- To share the configuration with colleagues, open the project under Menu → Projects and tap Share; the app writes a
.ecsurveysetup file with the project, protocol, forms, custom fields, sites and vocabulary. Colleagues open the file on their device, or use Import under Menu → Projects. To move the records as well, export a Frictionless Data Package from Menu → Admin → File Import & Export.
야외에서 기록하기
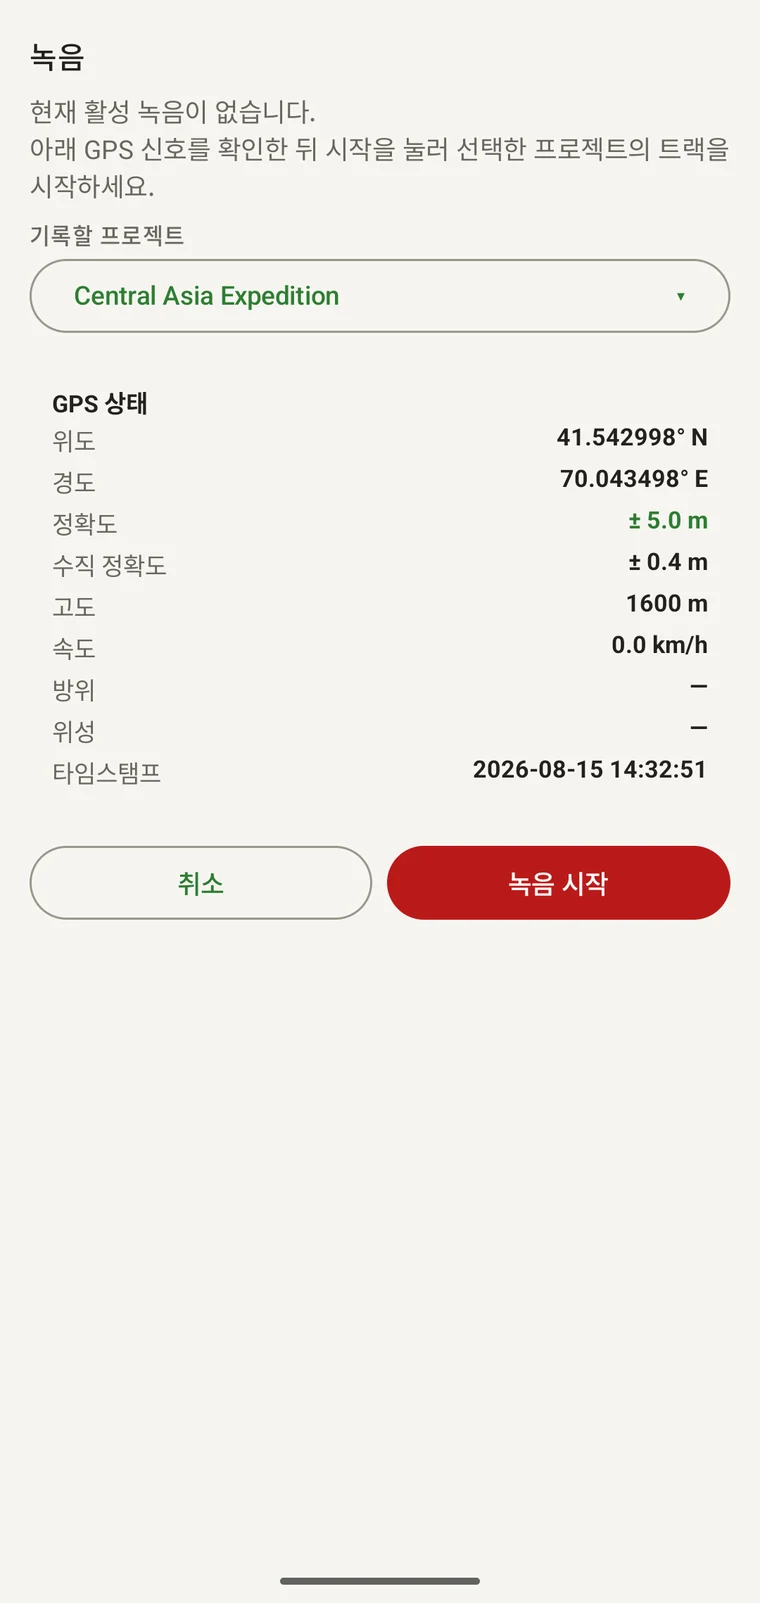
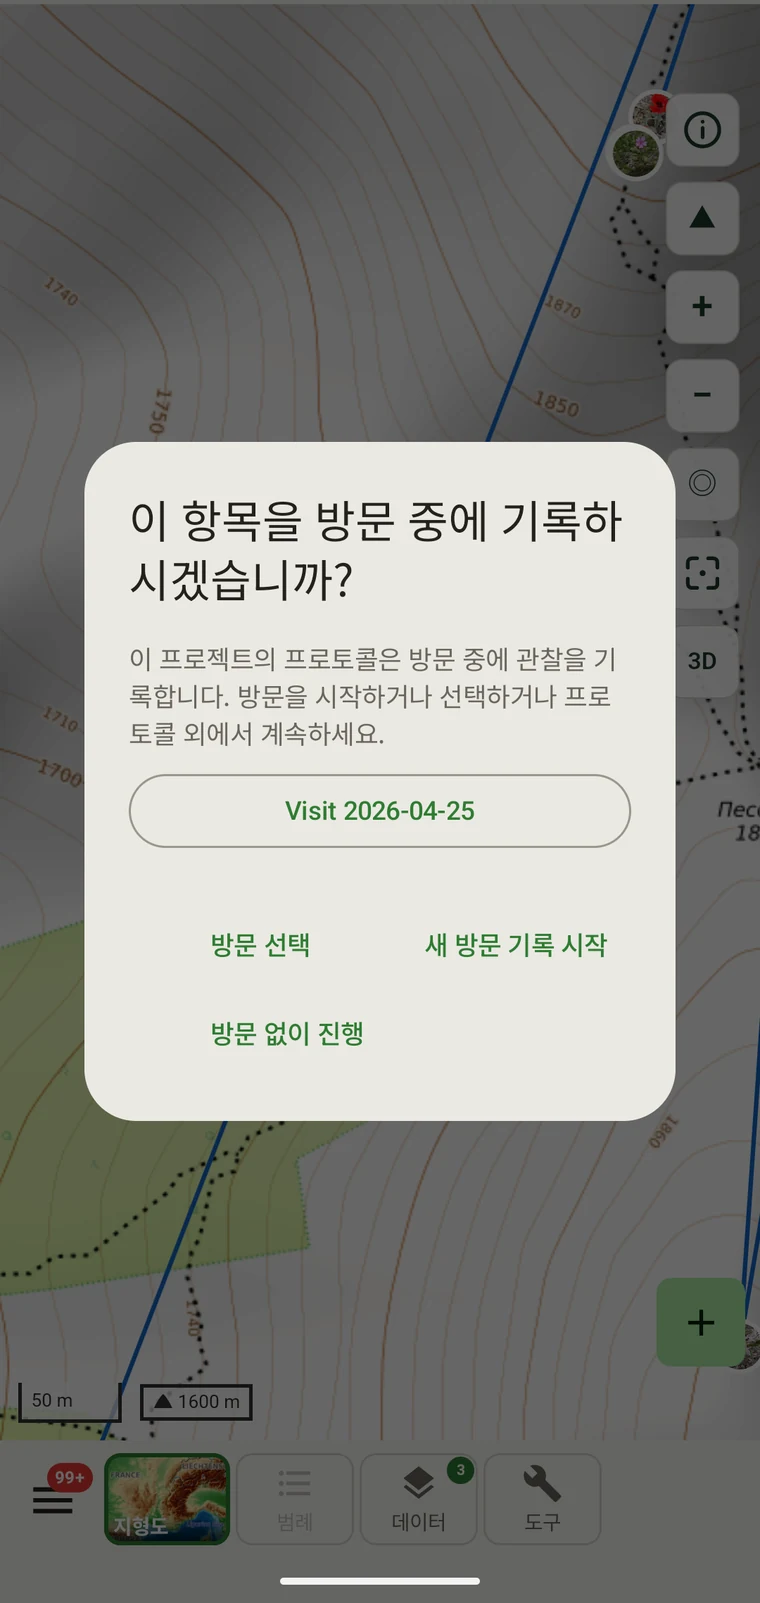
Recording a session means starting a GPS track, which creates a visit for the session, and entering observations as you work through the site. The Recording observations page covers all of this in detail.
- Open Record from the home screen or the Record tile in the Menu.
- Check the GPS status fields before you start: Latitude, Longitude, Accuracy, V-Accuracy, Altitude, Speed, Bearing, Satellites and Timestamp are all shown. Wait until Accuracy reaches an acceptable value for your work — ±5 m or better is typical in open terrain.
- 화면에는 활성 프로젝트 이름과 함께 "기록할 프로젝트"가 표시됩니다. 올바른지 확인하십시오.
- Tap Start recording. A visit is created for the session automatically, and observations you add while recording are linked to it.
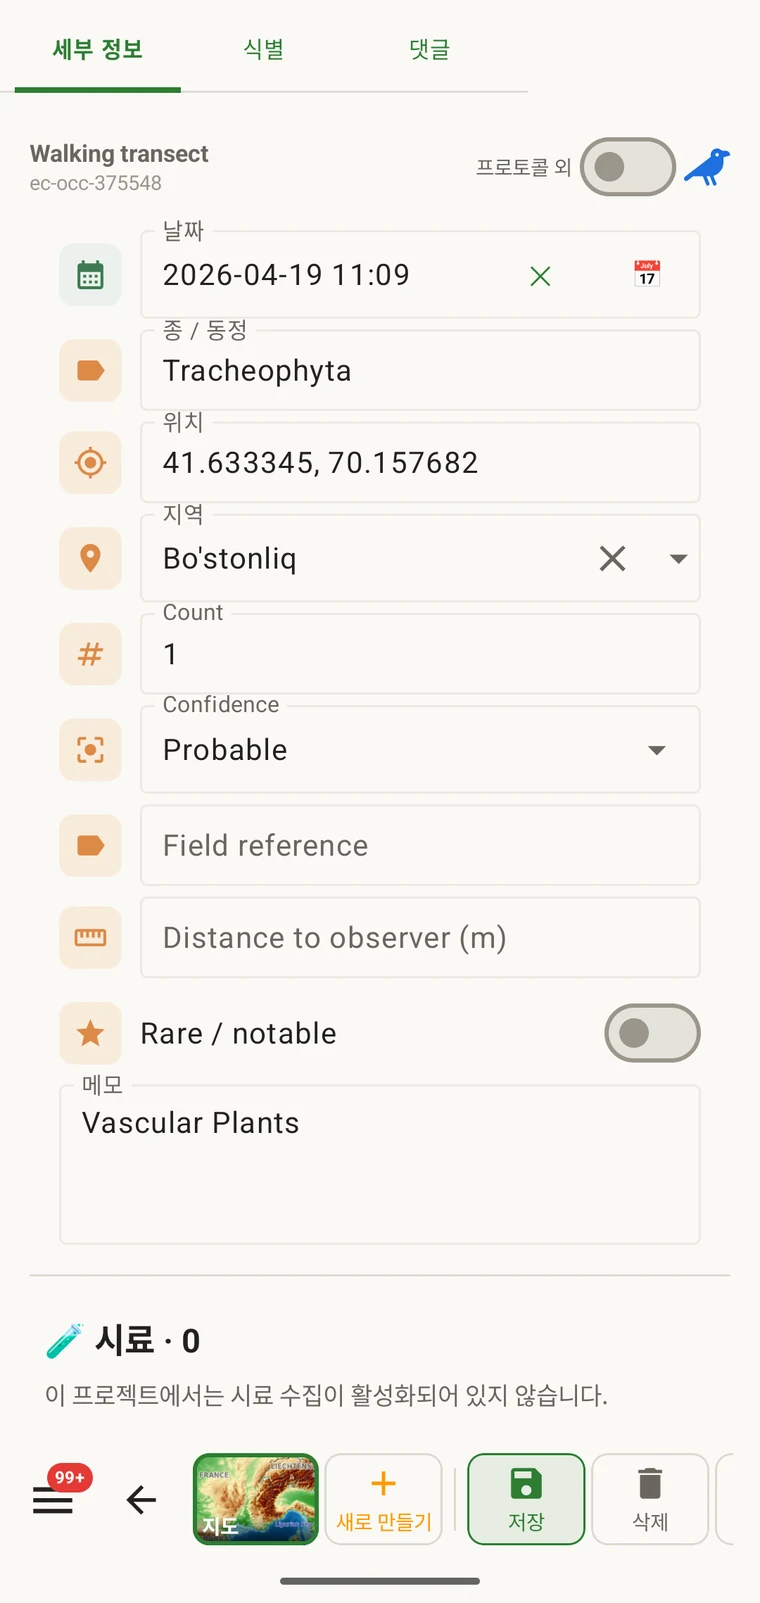
- 현장을 이동하면서 관찰을 추가하십시오. 각 관찰은 프로토콜의 양식을 열며, 분류군과 프로토콜 필드를 입력하고 필요하면 사진을 첨부합니다.
- When the session is finished, tap Stop & save. The track and all observations are saved to the on-device database.
수집한 내용 확인하기
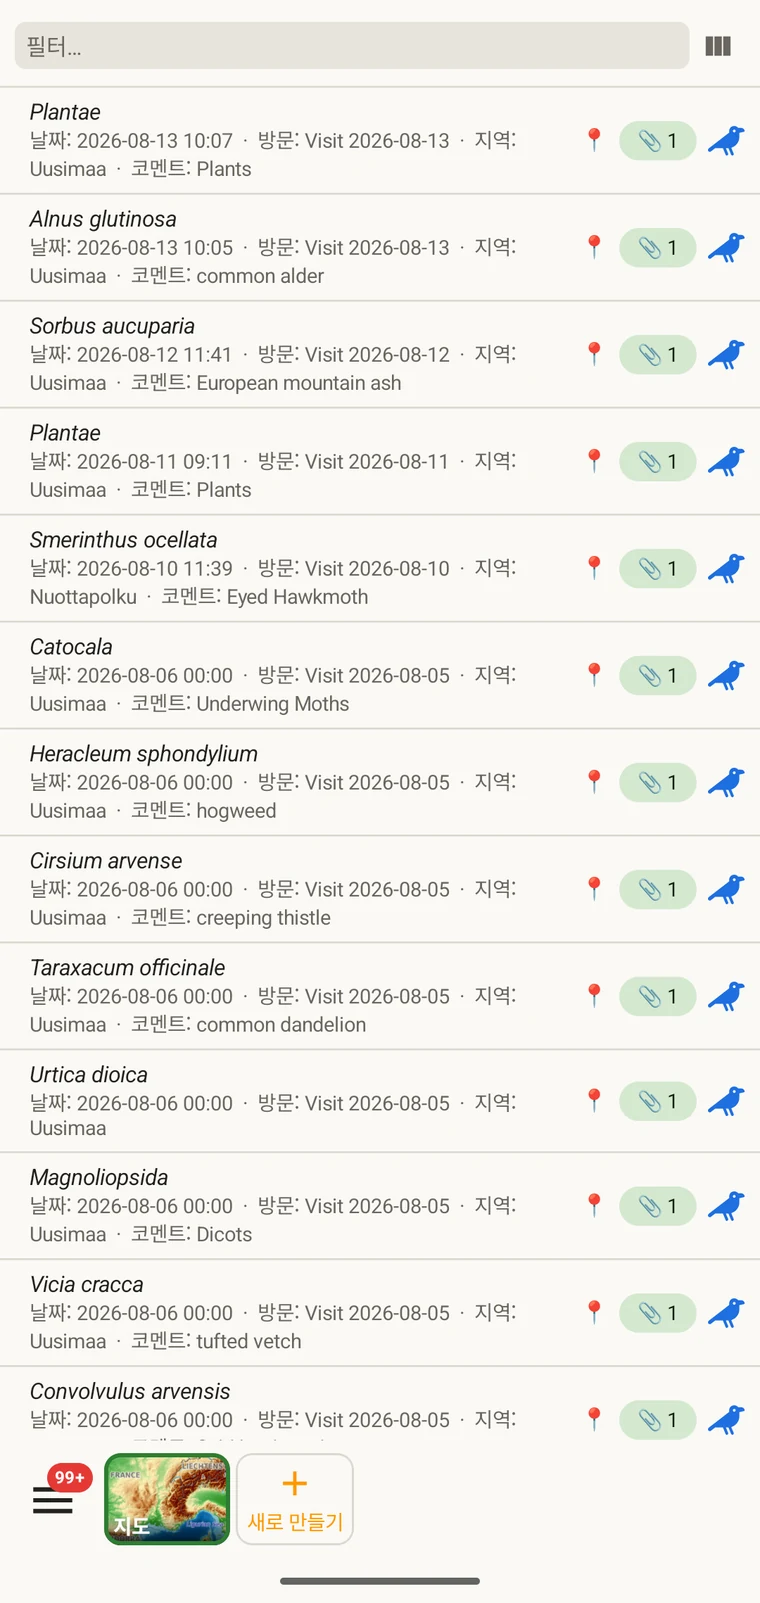
The data lists give you access to every record in the project as a filterable list. After a day in the field, use them to check completeness, find entry errors and open records for correction.
- Open Menu → Observations (or Visits, Localities, Taxa, or Files depending on what you want to review).
- The list opens with the default column set. Tap the columns icon (Choose columns) to add, remove or reorder columns — for example, add Accuracy or Altitude to check GPS quality.
- Type in the Filter… box to narrow the list; it matches text in any shown column. In the wide (tablet) grid each column has its own filter cell, and tapping a column header sorts by it.
- 행을 탭하면 전체 기록이 열리고 편집할 수 있습니다.
데이터 반출하기
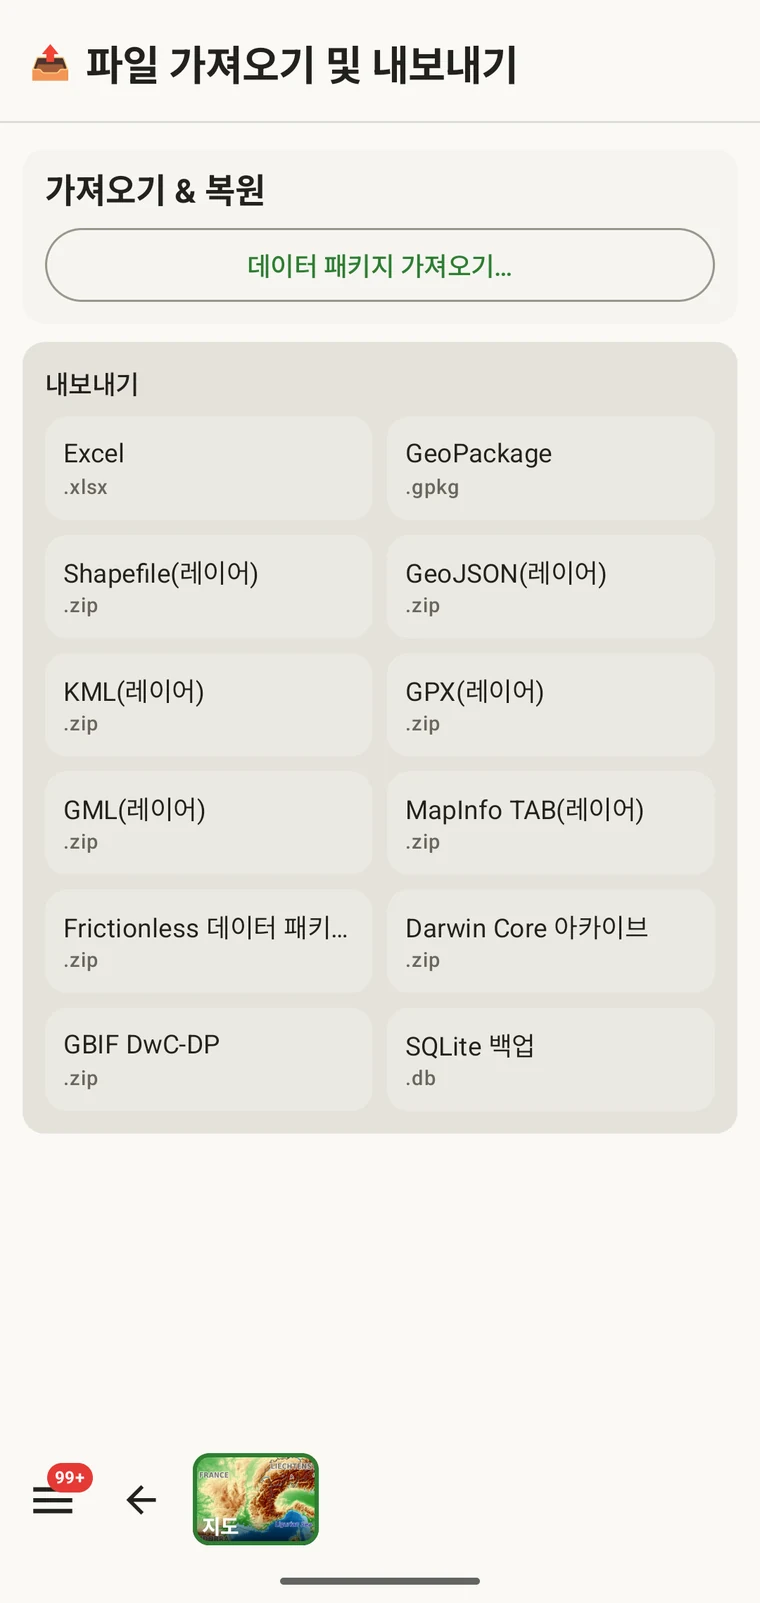
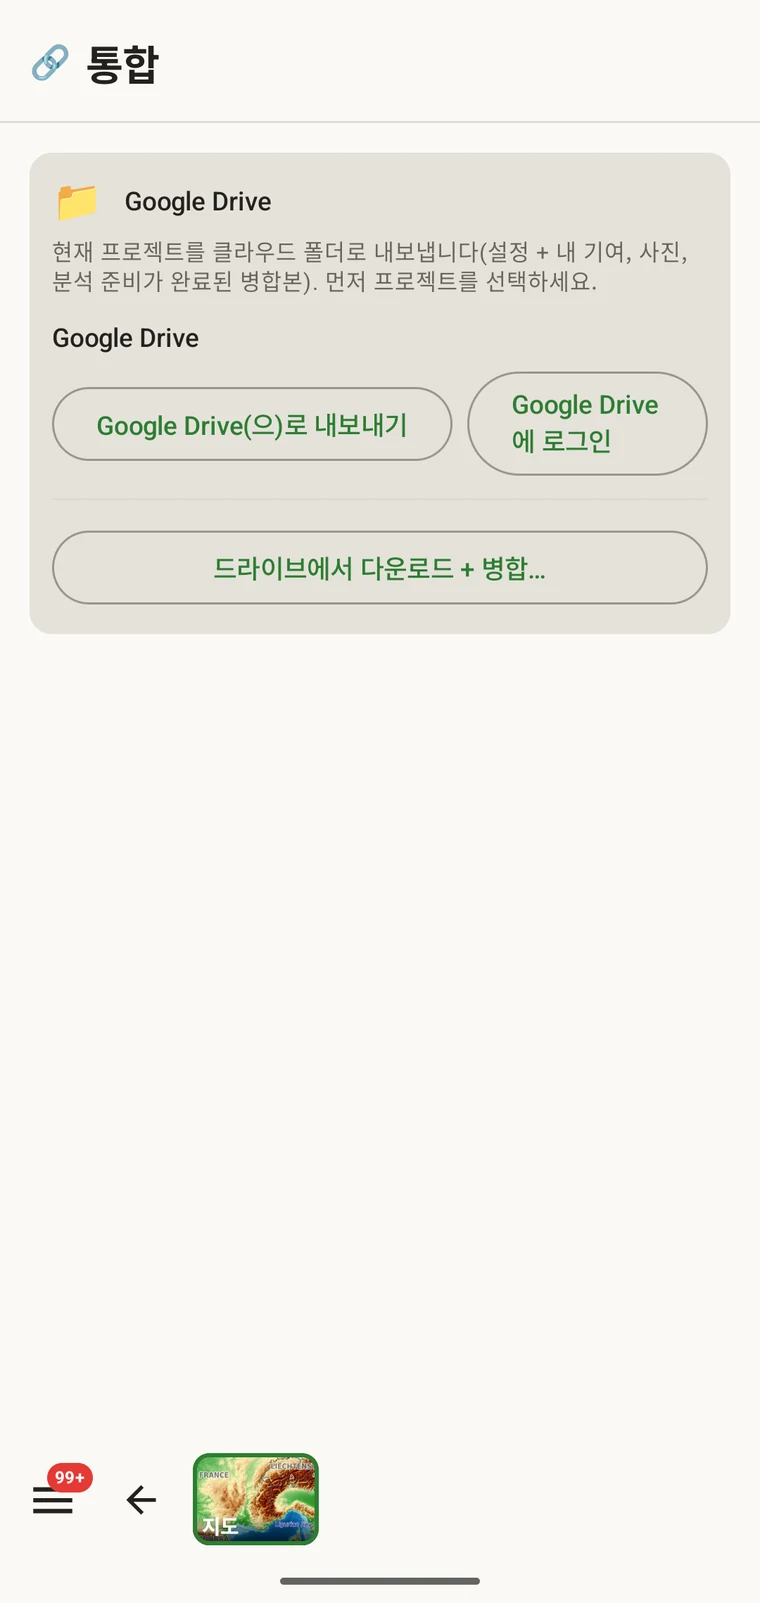
EarthCape exports to twelve formats. The right choice depends on your destination: Darwin Core Archive for a biodiversity repository, GeoPackage for a GIS, Excel for spreadsheet work. If several people are collecting data on the same survey, Google Drive lets you push each person's contribution to a shared folder and merge them — without an EarthCape account or a server (a Google account is needed for Drive). See Export formats and Google Drive collaboration for the full procedure.
- Open Menu → Admin → File Import & Export.
- 대상에 맞는 형식을 선택하십시오. 12가지 형식이 내보내기 화면에 나열되어 있습니다.
- Tap the format to generate the file. The filename is set automatically from the project name, its id and a timestamp.
- Android 공유 시트(Quick Share, Drive, 메시지, Bluetooth, Gmail 또는 설치된 그 밖의 대상)를 통해 파일을 공유하거나, 구성된 클라우드 대상으로 바로 전송하십시오.
- Alternatively, open Menu → Admin → Integrations and tap Export to Google Drive to push the current project — setup, your contributions, photos and an analysis-ready merge — to a shared Drive folder.
다음에 읽을 문서
이 안내에서 다룬 각 주제에는 전체 세부 내용을 담은 전용 참조 페이지가 있습니다.
| 다음을 원하는 경우… | 이동할 페이지 |
|---|---|
| 기본 지도의 작동 방식과 비용 이해하기 | 지도와 타일 서버 |
| 오프라인 영역 관리, 크기 확인, 오래된 다운로드 삭제 | 오프라인 지도 |
| 지도 측정, 트레일 스냅, 검색 사용하기 | 지도 도구 |
| 전체 기록 작업 흐름, 방문, 지역 익히기 | 관찰 기록 |
| 양식 레이아웃 구성 및 사용자 지정 필드 추가 | 양식과 사용자 지정 필드 |
| 조사 프로토콜 읽기 또는 작성 | 조사 프로토콜 |
| 기기 내 데이터 필터링, 정렬, 검토 | 데이터 탐색 |
| 대상에 맞는 내보내기 형식 선택 | 내보내기 형식 |
| Google Drive를 통해 동료와 데이터 공유 | Google Drive 협업 |