
기록
양식과 사용자 지정 필드
관찰 양식은 어떤 필드가 어떤 순서로 어떤 구간 제목 아래에 표시되는지, 그리고 어떤 필드가 사용자가 직접 추가한 것인지까지 구성할 수 있습니다. 시즌 전에 한 번 구성해 두면 조사에 참여하는 모든 사람이 모든 기기에서 같은 데이터를 같은 방식으로 입력합니다.
The form builder
The form builder lists every field available for an entity, grouped into sections. Each field row shows its data type and has controls to set its column span, mark it required, hide it, or remove it from the form. The example below shows the built-in "Casual / incidental" observation form.

To reorder, tap Reorder and use the up and down arrows on each field or section. To add a grouping, tap Add section and give it a name. To hide a field, tap its eye control; to take it off the form, tap its remove control. Hiding or removing a field does not delete data already stored against it; the data stays in the database and still appears in exports. Bringing the field back makes it visible again.
사용자 지정 필드 추가
The built-in fields cover the core observation attributes (taxon, date, position, count, confidence, notes and so on). When your protocol records something outside that set — a canopy cover score, a trap type, a microhabitat class — you add a custom field.
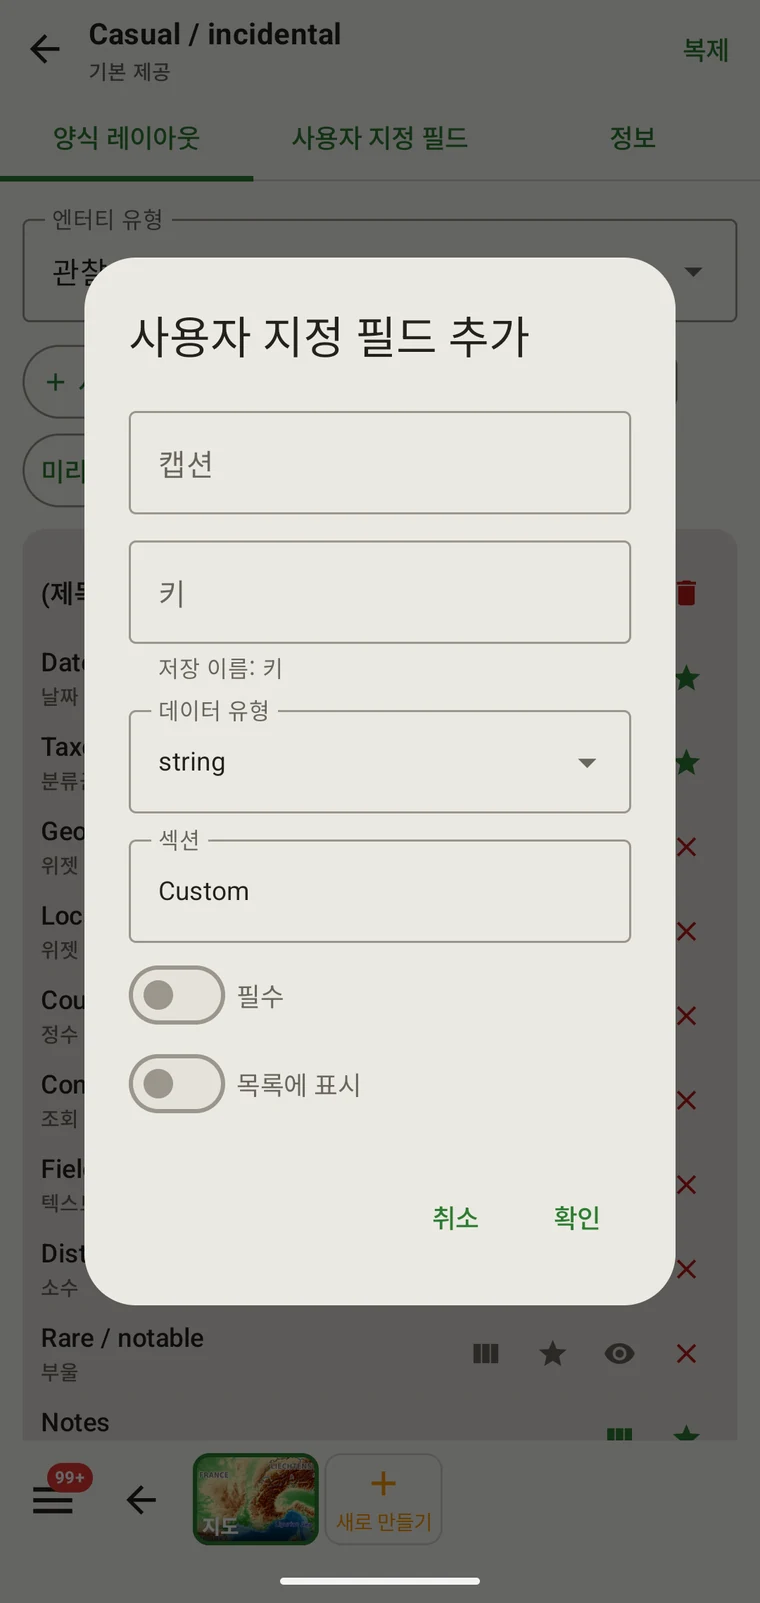
| 컨트롤 | 기능 |
|---|---|
| 제목 | 양식에서 기록자에게 표시되는 레이블입니다. 데이터를 입력하는 사람이 보게 되는 이름입니다. 저장된 데이터에 영향을 주지 않고 언제든지 변경할 수 있습니다. |
| 키 | The stable identifier used when the field appears in exports. Custom-field values are exported under this key inside the CustomFieldsJson column of Excel and Data Package exports. Choose it deliberately — your analysis scripts, R code or spreadsheet formulas will reference it by this name. Do not change it mid-season once data has been collected against it; changing the key produces a new empty key in exports and orphans the old data under the old name. |
| Data type | One of string, int, double, bool, date or lookup. A lookup field takes its options from a vocabulary name, a set code, or inline options JSON. The data type cannot be changed after the field is saved. |
| Section | The section of the form the field is placed in. New fields go into a section named "Custom" unless you type another name. |
| 필수 | Marks the field as required on the form. Required fields are shown with a star in the form builder; required fields that belong to the survey protocol are enforced when the record is saved. Use sparingly — a required field the recorder cannot always answer leads to records being abandoned rather than saved with the field empty. |
| 목록에 표시 | When on, the field is shown as a column in the Observations list by default. Every custom field can be added or removed from the list in the column picker; see Browsing your data. |
양식에 사용자 지정 필드를 추가하려면:
- Open the form builder for the entity you want to modify.
- Tap Add custom field above the layout.
- 기록자에게 표시될 제목을 입력하십시오.
- Enter the Key. Use lowercase with underscores and no spaces — for example
canopy_cover_pctortrap_type. This is the key your exports use. - Set the Data type.
- Leave Section as "Custom" or type the section the field belongs in.
- 필요에 맞게 필수와 목록에 표시를 설정하십시오.
- 확인하십시오. 필드가 양식에 추가되며 이 시점부터 내보내기에 나타납니다.
Key names and exports. The Key you choose here is the name your analysis tools will see. If you are sharing a project with other people, agree the key names before sharing the project setup file — a key entered differently on two devices produces two separate keys in a merged export.
양식이 있는 엔터티
Each entity that holds recorded data has its own form: observations, survey visits and localities. Forms are configured independently — a custom field added to the observation form does not appear on the locality form. Open Menu → Protocols, open a protocol (clone a built-in first) and use the Entity type dropdown on the Form builder tab to switch between the three forms. To adjust the layout for one project only, tap Customize in the project's Survey protocol section.
구조화 편집기
Where a flat list of fields is not adequate, the app has a purpose-built editor that sits directly on the visit record:
- Vegetation relevé — a stand-level block (total cover, height, slope, aspect, cover per stratum) and a species × stratum cover-abundance matrix. It appears on the visit when the project uses one of the three vegetation protocols (Braun-Blanquet, % cover, Drude).
This is a fixed component tied to those protocols, not a field you configure in the form builder.
구성을 다른 기기로 옮기기
Form and protocol configuration is not stored as a global setting — it belongs to the project. To give every device on a survey the same forms, share the project setup file and import it on each device.
실제 작업 순서:
- Design the forms, add custom fields and assign a protocol on one device.
- Open Menu → Projects, open the project, and tap Share in the toolbar. The app writes a
.ecsurveyfile containing the project, its protocol, forms, custom fields, sites and vocabulary, and opens the share sheet. - Send the file to each team member — by Drive, e-mail, Bluetooth or cable.
- On each device, open the file, or open Menu → Projects and tap Import. Confirm the Import project setup dialog. The project appears with the same forms, fields and protocol.
After import, every device records against the same field layout, using the same keys, and produces exports that merge cleanly. If you need to change the form mid-season, repeat the process: update the configuration on one device, share a new .ecsurvey file, and import it again on every device.
Setup is separate from records. A .ecsurvey file carries configuration only. If the project already exists on the receiving device, its configuration is overwritten and its records are kept. To combine records collected on several devices, use Download from Drive + merge… (see Google Drive collaboration) or import a Frictionless Data Package with Import data package… on the export screen.
내보내기에 나타나는 방식
In Excel, Frictionless Data Package and the Google Drive CSVs, custom-field values are stored in one column per record, CustomFieldsJson, as a JSON object keyed by the Key you assigned. For example {"custom.canopy_cover_pct": 35}. Analysis scripts read the values from that column; the field definitions themselves are exported in mobile_fields_metadata.csv inside the data package.
Custom fields are not written to the spatial formats (GeoPackage, Shapefile, GeoJSON, KML, GPX, GML, MapInfo) or to the Darwin Core Archive and GBIF DwC-DP, which carry only the standard attributes. Use Excel or the Frictionless Data Package when you need the custom values.
The Key still matters more than the Caption after fieldwork: the Caption is for the person entering the data, the Key is what every script sees. See Export formats for a full description of each format.
언어
The app interface is translated into 19 languages; see Languages for the full list and how to switch. Protocol names and descriptions, and any captions you type yourself, are stored as written and are not translated.
If a multilingual team shares a project setup file, the custom field captions will appear in whichever language was used when they were created, on every device. Agree the caption language with your team before designing the form and sharing the setup file.